
How to Align Garage Door Safety Sensors
If your garage door reverses the moment it starts to close, refuses to shut unless you hold the wall button down, or the sensor lights are blinking instead of holding steady, there’s a strong chance your safety sensors are out of alignment. It’s one of the most common garage door issues on the Gold Coast, and fortunately, it’s one of the easier problems to fix yourself. Sensor issues are one of the more straightforward repairs on a garage door opener, but if the unit has other failing components too, our breakdown of garage door opener repair vs replacement costs will help you decide whether fixing the sensors alone is enough.
Garage door safety sensors are a critical safety feature — they prevent the door from closing on people, pets, vehicles, and anything else in its path. When they’re misaligned, the door either won’t close at all or behaves unpredictably, which is both frustrating and potentially dangerous. This guide walks you through what these sensors do, how to realign them properly, and when the problem goes beyond a simple adjustment. If your door has multiple issues happening at once — noise, uneven movement, or sticking — our garage door troubleshooting guide covers the broader picture.
What Are Garage Door Safety Sensors?
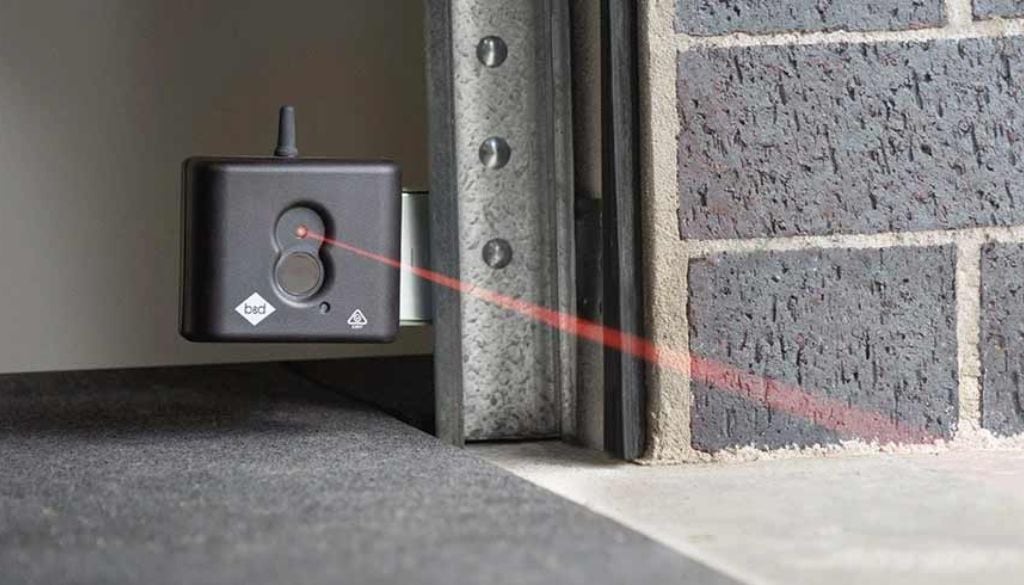
Garage door safety sensors are a pair of photoelectric devices mounted on either side of the garage door opening, close to floor level. One sensor is the transmitter — it sends an invisible infrared beam across the doorway. The other is the receiver — it detects that beam. When the beam is unbroken, the system knows the path is clear and allows the door to close. When something interrupts the beam — a child, a pet, a bin left in the way — the system triggers the auto-reverse function, stopping and reversing the door immediately.
These sensors are a mandatory safety feature on automatic garage door openers. They work as part of the obstruction detection system that prevents the door from closing on objects or people. The transmitter and receiver must be precisely aligned and facing each other directly for the beam to connect. Even a small shift — from a bump, vibration, or settling over time — can break that connection and cause the door to behave as though something is permanently in the way.
Why Proper Sensor Alignment Is Important
Misaligned sensors don’t just make the door inconvenient to use — they compromise the entire safety system. If the sensors can’t communicate properly, the door may refuse to close, which leaves your garage open and exposed. Alternatively, some older or poorly maintained systems may allow the door to close despite a misalignment, which means the auto-reverse function isn’t working as intended — a genuine safety risk, particularly in homes with young children or pets.
Beyond safety, a door that repeatedly tries to close and reverses puts unnecessary strain on the opener motor, the drive mechanism, and the door’s moving parts. Over time, this can shorten the lifespan of the opener and lead to more expensive repairs. If you’re curious about how different opener systems handle safety features and sensor integration, our garage door opener comparison explains the key differences.
Signs Your Garage Door Sensors Are Misaligned
The symptoms are usually obvious once you know what to look for. The most common sign is a door that starts to close, then immediately reverses back up — with no visible obstruction in the doorway. Another telltale indicator is needing to hold the wall-mounted button continuously to get the door to close; most openers bypass the sensor system when the button is held down, which is a built-in workaround but not a long-term solution.
Check the sensor lights themselves. On most systems, the transmitter shows a steady light (often amber or green) regardless of alignment, while the receiver light blinks or stays off when it’s not picking up the beam. A blinking receiver light is a clear signal that the sensors aren’t aligned. If both lights appear steady but the door still won’t close, the issue may be wiring, sunlight interference, or a faulty sensor rather than alignment. When working near the bottom of your door to replace seals, be careful not to knock the safety sensors out of position — even a small bump can cause issues, so bookmark our guide on garage door sensor alignment and adjustment in case your door starts reversing unexpectedly after the install.
Where Garage Door Safety Sensors Should Be Positioned
Both sensors should be mounted at the same height on either side of the garage door opening, typically around 150 millimetres (roughly six inches) from the floor. This height is low enough to detect small objects and pets in the door’s path while being high enough to avoid false triggers from minor floor debris.
The sensors must face each other directly across the opening, with a clear, unobstructed beam path between them. Nothing should be partially blocking the line of sight — garden tools leaning against the frame, cobwebs across the lens, or even bright direct sunlight hitting the receiver can interfere with the signal.
Tools and Safety Precautions Before You Start
You’ll need a screwdriver (Phillips or flat-head, depending on your sensor brackets), a measuring tape, a soft dry cloth for cleaning the lenses, and optionally a length of string or a spirit level to help verify alignment. No specialised tools are required for this job.
Before touching anything, disconnect the power to the garage door opener — either unplug it from the ceiling outlet or switch it off at the circuit breaker. This prevents the door from activating while you’re working near the sensors and the door opening. Never work on or near the door while it’s in motion.
Step-by-Step: How to Align Garage Door Safety Sensors
Step 1 — Turn Off Power to the Opener
Disconnect the opener from its power source. Confirm the opener is off by pressing the wall button — nothing should happen. This is a non-negotiable safety step.
Step 2 — Clean the Sensor Lenses
Use a soft, dry cloth to gently wipe both sensor lenses. Dust, cobwebs, moisture, and grime are common on the Gold Coast, especially in garages that stay open during the day. Even a thin film of dust can weaken the infrared beam enough to cause intermittent connection issues. This single step resolves the problem more often than people expect. If you’re also noticing grime on the tracks while you’re down at floor level, our guide on how to remove grease from garage door tracks walks you through a proper clean.
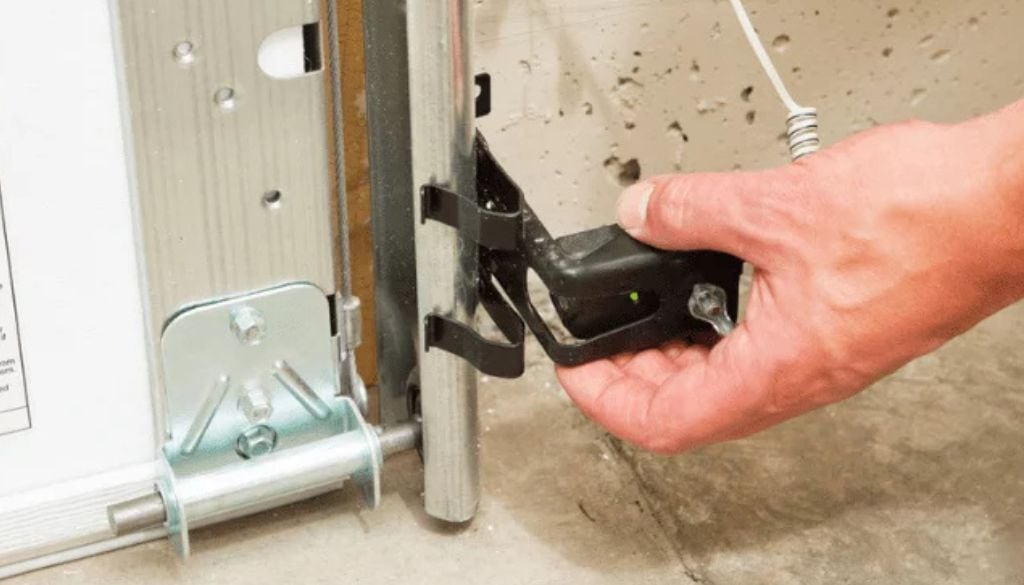
Step 3 — Loosen the Sensor Mounting Brackets
Using your screwdriver, loosen the screws or wing nuts on both sensor brackets just enough that the sensors can be moved by hand. Don’t remove the screws entirely — you want the sensors to pivot and slide on the bracket while staying attached to the frame.
Step 4 — Align Sensors to the Same Height
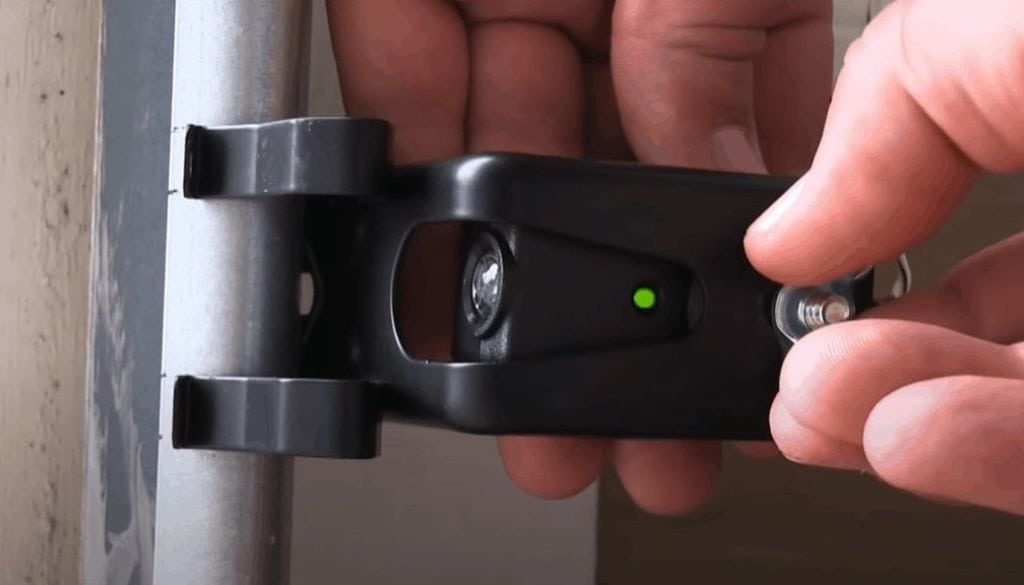
Measure from the garage floor to the centre of each sensor. Both should be at exactly the same height. Even a difference of a few millimetres can cause the beam to miss. Adjust the brackets up or down as needed until both measurements match. A spirit level or a taut string line stretched between the two sensors can help verify they’re on the same horizontal plane.
Step 5 — Aim Sensors Directly at Each Other
With both sensors at the same height, angle them so they point directly across the opening at each other. The easiest method is to aim one sensor and then adjust the other until the receiver’s indicator light changes from blinking to steady. On most systems, the receiver light will hold a solid green when it’s picking up the transmitter’s beam cleanly.
If you’re having trouble getting the light to hold steady, try holding a piece of cardboard behind the receiver to block any reflected sunlight, which can confuse the sensor.
Step 6 — Tighten Brackets and Restore Power
Once both sensors show steady indicator lights, carefully tighten the mounting screws without shifting the sensors. Check the lights again after tightening — it’s easy to nudge a sensor out of alignment while securing it. Restore power to the opener.
How to Test Garage Door Safety Sensors
With the power back on, test the system properly. Open the door fully, then press the close button. The door should close smoothly and completely. Next, place a solid object — a cardboard box or a broom handle — in the sensor beam path and press close again. The door should reverse immediately when the beam is broken. If it doesn’t, the sensors need further adjustment or professional inspection.
Get into the habit of testing this monthly. It takes thirty seconds and confirms that the safety system protecting your family is functioning correctly.
Common Sensor Problems and Fixes
A blinking receiver light after alignment usually means the sensors still aren’t quite lined up, or there’s interference. Direct afternoon sunlight hitting the receiver is a common issue on west-facing garages — a small shade or hood over the sensor can solve this without relocating it.
Loose or damaged wiring is another frequent cause. Check the wires running from each sensor back toward the opener for obvious damage — fraying, cuts from garden tools, or connections that have pulled loose from the terminal. If the wiring is damaged, that’s a job for a qualified technician rather than a DIY splice.
Sensors can also be knocked out of alignment by everyday activity — bumping them with a wheelie bin, kids’ bikes leaning against the frame, or even vibration from heavy traffic if your garage faces a main road. If your sensors keep shifting, the mounting brackets may be worn and need replacing.
Mistakes to Avoid When Aligning Sensors
The most common mistake is ignoring height differences between the two sensors. Even if they appear to face each other, a height mismatch means the beam passes above or below the receiver. Always measure both sides. Over-tightening the bracket screws can crack plastic sensor housings or bend the bracket, making future adjustments harder. Tighten firmly but not aggressively. Skipping the cleaning step is another frequent oversight — alignment may be perfect, but a dirty lens will still block the beam. And never force the door closed by holding the wall button as a permanent workaround. The sensors are telling you something isn’t right, and bypassing them removes a critical safety layer.
When to Call a Garage Door Professional
If you’ve cleaned, aligned, and tested the sensors and the door still won’t close properly, the problem is likely beyond a simple adjustment. Damaged wiring, a faulty sensor unit, or an issue with the opener’s control board all require professional diagnosis. Sensor replacement itself is straightforward for a technician, but it needs to be done with the correct compatible unit for your opener model.
If the door is exhibiting other problems alongside the sensor issue — unusual noises, uneven travel, or panel damage — those are signs the door needs a broader service. Our article on how to tighten garage door cables covers one of the mechanical issues that sometimes coincides with sensor problems, particularly if the door has been bumped or impacted.
How Often Should Garage Door Sensors Be Checked?
Test the sensors monthly using the object test described above. Clean the lenses every two to three months, or more frequently if your garage is in a dusty or coastal area. After any renovation, landscaping work, or incident where something may have contacted the sensors or the door frame, do a quick visual check and test before relying on the door to operate normally. If you’re already doing seasonal garage maintenance — cleaning tracks, checking weather stripping — adding a sensor check takes less than a minute. Our guide on how to install garage door weather stripping fits naturally into the same maintenance routine.
Frequently Asked Questions
How do you align garage door safety sensors?
Disconnect power, clean both lenses, loosen the mounting brackets, measure both sensors to the same height from the floor, aim them directly at each other until the receiver light holds steady, then tighten the brackets and test the door with an object in the beam path.
Why is my garage door sensor blinking?
A blinking light on the receiver sensor means it’s not picking up the infrared beam from the transmitter. This is usually caused by misalignment, a dirty lens, sunlight interference, or damaged wiring.
What height should garage door sensors be?
Approximately 150 millimetres (six inches) from the garage floor. Both sensors must be at exactly the same height for the beam to connect.
Can I fix garage door sensors myself?
Alignment and cleaning are well within most homeowners’ ability. If the issue involves damaged wiring, a faulty sensor unit, or the opener’s control board, call a qualified technician.
Still Having Trouble With Your Garage Door Sensors?
If alignment hasn’t solved the problem, the team at A1 Garage Doors Gold Coast can diagnose and fix the issue quickly. We handle sensor replacements, wiring repairs, and full opener servicing across the Gold Coast and Brisbane — backed by a 4.9-star rating from homeowners who rely on us to keep their doors safe and operational.
Call (07) 5515 0277 for a same-day assessment, or visit goldcoastgaragedoorrepair.com.au to book online.