You press the button on your remote. The opener hums to life. The motor runs — but the door doesn’t budge. It’s one of the more frustrating garage door faults a homeowner can face, especially if your car is stuck inside. Before assuming the opener itself is the problem, it’s worth ruling out a mechanical restriction in the track system — a blocked or misaligned track is one of the most common reasons a motor runs without moving the door, and our Garage Door Won’t Open – Is a Bad Sensor the Problem?step-by-step track repair guideYour garage door is stuck and won’t budge. Before you panic, consider one of the most common culprits Gold Coast homeowners overlook: the safety sensors. These small devices sit near the base of your door and act as the last line of defence against accidents — but when they play up, they can also be the reason your door refuses to move at all. walks you through exactly what to inspect.This guide walks you through how garage door sensors work, how to recognise when they’re failing, and what you can do right now to troubleshoot the problem — including when it’s time to call in the professionals.
Most Common Reasons the Motor Runs but the Door Won’t Open<
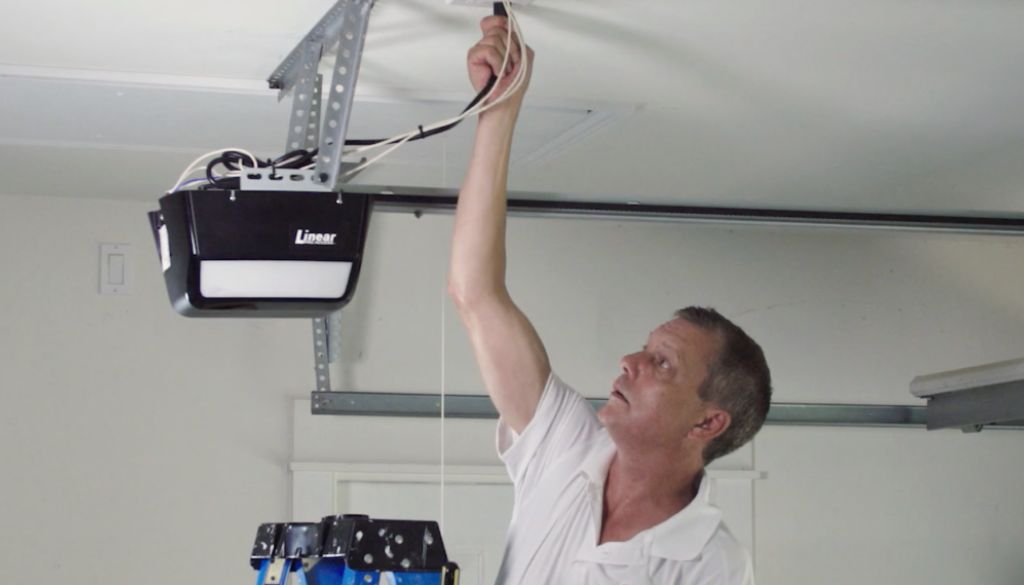
span data-mce-type="bookmark" style="display: inline-block; width: 0px; overflow: hidden; line-height: 0;" class="mce_SELRES_start">Use the table below to quickly match what you’re seeing to the likely cause:
| Stripped internal gears | Grinding noise, no movement | No — opener repair needed |
| Frayed or snapped cables | Uneven movement or door drops | No — professional repair |
Sensor units are connected to the opener motor by thin wiring that runs along the door frame. Over time, this wiring can be pinched by the .
3. Slipping or Broken Chain/Belt Drivedoor mechanism
The chain or belt connecting the motor to the trolley carriage can stretch, snap, or come off its sprocket. When this happens, the motor turns but nothing moves along the rail., chewed by rodents, corroded by moisture, or simply pull loose from the terminal connections on the opener unit. Damaged wiring can cause symptoms that mimic sensor malfunction but require a different repair approach.
A hanging or coiled chain lying on the rail, or a belt that’s visibly split or slack, is a clear indicator. Minor chain sag (more than 1–2 cm below the rail) can sometimes be tightened; a fully snapped drive requires professional service or opener replacement.Electrical Interference
4. Stripped Gears Inside the OpenerLess common but worth knowing: in some cases, nearby electrical equipment, LED lighting, fluorescent tubes, or even bright sunlight shining directly onto a sensor receiver can disrupt the infrared signal. If your sensor problems seem to occur only at certain times of day or after installing new lighting, interference may be worth investigating.
Inside the opener head sits a plastic drive gear that transfers motor power to the rail. These gears are deliberately made softer than the motor components — they’re designed to fail first to protect the motor. Over time, or after a mechanical overload event, these teeth strip and the motor spins without turning the drive.How to Test If Your Garage Door Sensor Is Faulty
Signs: a grinding or whirring sound from the motor unit, a faint burning-plastic smell, and zero trolley movement. Gear replacement kits are available for most major brands (B&D, Merlin, Chamberlain), but the work requires disassembly of the opener head — best handled by a technician.Check Sensor Alignment
5. Broken or Loose Lift CablesStand inside your garage and look at both sensor units. The LED lights should be glowing solidly. If one is blinking or off, that sensor is out of alignment. Loosen the wing nut or mounting bracket slightly, gently rotate the sensor until the light becomes solid, then retighten. Both sensors must face each other directly across the door opening for the beam to connect cleanly. For a complete walkthrough of common problems, visit our
Steel lift cables run from the bottom bracket of the door up to a drum at each end of the torsion spring bar. They help control the door’s descent and assist with lifting. A frayed or snapped cable causes uneven movement — one side of the door drops while the other holds, or the door refuses to lift at all.garage door troubleshooting guide
If you see a cable lying coiled on the floor or one side of the door dropping lower than the other, do not operate the opener. Cable repair involves working with spring tension and is strictly a professional task..
Step-by-Step Troubleshooting for a Garage Door That Won’t OpenClean the Sensor Lenses
Work through these checks in order. Stop immediately if you find evidence of broken springs or cables.Use a clean, dry microfibre cloth to gently wipe the lens on each sensor unit. Don’t use water, cleaning sprays or solvents — these can leave residue or damage the plastic housing. If the lens has visible spider webs or heavy build-up, use a dry cotton bud to clear the debris before wiping. In most cases, cleaning takes under a minute and can resolve sensor issues instantly.
Step 1 — Check the Manual Release MechanismTest the Sensor Beam
Locate the red emergency release cord hanging from the trolley carriage on the rail. If it’s been pulled, the door will be in manual mode. Re-engage it (pull toward the motor, then slide the trolley back into the drive slot) and test your remote.With the door in the open position, slowly wave a broom handle or cardboard box through the sensor beam path. The opener should immediately respond — its lights may flash, or it will refuse to proceed with the close command. If the opener shows no response at all to an object in the beam path, the sensor circuit is not functioning and requires professional attention. This is an important safety check, since a sensor that doesn’t detect obstructions has lost its primary protective function.
Step 2 — Inspect the Garage Door SpringsInspect Sensor Wiring
From a safe distance, look at the torsion spring bar directly above the door. Look for any visible gap or separation in the coil. Then check the Trace the wiring from each sensor unit back to the extension springsopener motor along the upper side tracks. Do not touch them. If you find a broken spring, stop and call a professional.. Look for any sections where the wire is pinched, kinked, frayed, or disconnected at the terminal block. Loose wiring connections at the opener terminal are particularly common after vibration from repeated door cycles. If you find obvious damage, do not attempt to splice or repair wiring yourself — call a qualified technician to ensure the repair meets Australian safety standards.
Step 3 — Examine the Chain or Belt DriveQuick Sensor Troubleshooting Checklist
With the opener unplugged, look at the drive system. Is the chain hanging low, coiled on the floor, or clearly separated? Is the belt split or slack? Check where the drive connects to the trolley and the sprocket at the motor end.* Look at sensor LED lights — are they solid or blinking?
Step 4 — Check Tracks, Rollers, and Obstructions * Clear any objects within 30 cm of the sensor path
Look along both vertical and horizontal tracks for dents, bends, or debris. Even a small rock or piece of trim caught in the track can prevent movement. Rollers should sit squarely in the track — worn or cracked rollers will stick. Clear any obstructions and check that the track bolts are tight. * Wipe sensor lenses with a dry, lint-free cloth
Step 5 — Reset the Garage Door Opener * Check that both sensor brackets point directly at each other
If the mechanical components look fine, unplug the opener from the power outlet, wait 30 seconds, then plug it back in. This clears any electronic fault or tripped internal breaker. Test the door from both the remote and the wall button. If the motor runs but the door still doesn’t move, the issue is mechanical and needs professional attention. * Inspect wiring from sensors to the opener for visible damage
When You Should Call a Professional Garage Door Technician* Perform the ‘wave test’ — pass a broom handle through the beam
Some garage door problems are genuinely DIY-friendly. Others carry real injury risk. The table below draws a clear line:* If all steps fail, call A1 Garage Doors Gold Coast:
| Safe to DIY(07) 5515 0277 | Call a ProfessionalTemporary Workarounds for Sensor Problems |
|---|---|
| Re-engage manual release cordUse the Wall Console Override | Broken torsion or extension springsIf you need to close your garage door urgently while waiting for repairs, you can hold down the wall-mounted button continuously until the door is fully closed. This bypasses the sensor circuit and forces the door to move. Important: only use this override when you have a clear, unobstructed view of the door’s entire travel path. Never use this method if children or pets are present. This is a temporary measure only — a door operating without functioning sensors is a safety hazard and should be repaired promptly. |
| Clear track obstructionsSwitch to Manual Operation | Snapped lift cablesYour garage door opener has an emergency release cord — usually a red rope hanging from the trolley mechanism. Pulling this cord disconnects the door from the opener drive, allowing you to lift or lower the door manually. This is useful if you need to move a vehicle quickly, but remember: a manually operated door has no automatic safety features. Lift carefully and ensure the door is balanced before letting go. |
| Power-cycle the openerWhen to Replace or Repair Garage Door Sensors | Off-track or bent trackPersistent Sensor Failure |
| Inspect chain/belt visuallyIf you’ve cleaned the lenses, re-aligned the brackets, and confirmed the wiring looks intact but the sensors still won’t behave, the sensor units themselves may have failed internally. Sensor units are relatively inexpensive to replace, and a professional technician can swap them out in under an hour. Replacement sensors should be matched to your opener brand for compatibility. | Stripped opener gears or motor failureDamaged Wiring or Hardware |
| Lubricate rollers and hingesVisibly damaged wiring, corroded brackets, or physically cracked sensor housings all indicate the need for replacement rather than repair. Attempting to patch damaged electrical components in a safety-critical system is not recommended. If your opener is more than 10–15 years old, it may be worth considering a full system upgrade — our | Any work near springs under tensiongarage door opener comparison |
Broken Springs can help you find the right option for your home.
Torsion and extension springs store enough energy to cause severe injury if released uncontrolled. Spring replacement requires specialised winding tools and must be performed by a qualified technician. Never attempt to remove, adjust, or replace a garage door spring yourself.Professional Inspection
Cable or Track DamageFor anything involving wiring, electrical components, or sensors that continue to fail after basic troubleshooting, always engage a qualified garage door technician. Incorrect repairs can create serious injury risks. A professional inspection will also identify any underlying opener or structural issues that may have caused the sensor problem in the first place. If your door has stopped working entirely, our emergency garage door repair service is available when you need fast help.
A snapped cable or an off-track door can result in the door collapsing. If either side of the door is sagging, the tracks are visibly bent, or a cable has come free, keep everyone away from the door and call for service immediately.Preventing Garage Door Sensor Problems
Opener Gear or Motor FailureRegular Cleaning
If the opener itself has failed — stripped gears, a burnt motor, or damaged circuit boards — you’ll need a repair or replacement assessment. A technician can advise whether a gear kit is the right fix or whether the unit is past the point of cost-effective repair. Our Wipe down sensor lenses every two to three months, or more frequently during Queensland’s humid summer months. Pay extra attention after storms, which can splash mud and debris onto low-mounted sensors. A quick wipe takes 60 seconds and can prevent hours of troubleshooting.garage door opener comparison and buying guideChecking Alignment Periodically breaks down the top options available on the Gold Coast.Glance at your sensor LED lights each time you use your garage door. Both should be glowing solidly. If you notice a blinking light, take a moment to gently adjust the affected bracket before it becomes a full failure. Catching misalignment early is far easier than diagnosing a door that’s completely stopped working.
Need help today? Call A1 Garage Doors Gold CoastInspecting Wiring
If your inspection reveals a broken spring, snapped cable, or stripped gear — don’t delay. A1 Garage Doors Gold Coast has been serving homeowners across the Gold Coast since 2020, with a 4.9-star rating and same-day service available. Call us on Once or twice a year, trace the sensor wiring along the door frame and check for signs of wear, pest damage, or loose connections at the opener terminal. Gold Coast’s warm climate makes wiring insulation vulnerable to UV degradation over time, particularly in garages with poor ventilation. Early detection of wiring wear prevents sudden failures.(07) 5515 0277Frequently Asked Questions or Why won’t my garage door open even though the sensor lights are on?book a repair onlineA steady light means the sensors are aligned and the beam is intact — but the problem may lie elsewhere. Check for wiring faults between the sensor and opener, or consider that the opener itself may have a fault. If the door was recently replaced, also check that sensor height complies with Australian standard requirements.. We cover all Gold Coast suburbs and parts of Brisbane.What does a blinking garage door sensor light mean?
Preventing Garage Door Opener ProblemsA blinking LED indicates that the beam is not connecting cleanly between the two sensor units. This almost always means the sensors are misaligned. Gently adjust the bracket on the blinking sensor until the light becomes solid.
Routine Maintenance TipsCan I bypass garage door sensors temporarily?
* Lubricate all moving parts every 6 months — use a silicone spray on rollers, hinges, springs, and the drive chain or belt. Avoid WD-40, which attracts dust.Yes — by holding down the wall button continuously, most openers will close the door with the sensor circuit bypassed. This should only be used when the path is completely clear and as a short-term measure until sensors are repaired.
* Inspect cables and rollers for wear every 3 months. Fraying cables should be replaced before they snap.How much does it cost to replace garage door sensors in Australia?
* Test door balance monthly: disconnect the opener, lift the door manually to waist height, and let go. A balanced door should hold; one that drops or shoots up has a spring issue.Sensor unit replacement typically costs between $80 and $200 including labour, depending on the opener brand and sensor type. Call A1 Garage Doors Gold Coast on
* Check and clear the photo-eye safety sensors at the base of the door tracks — dirty or misaligned sensors can prevent the door from operating.(07) 5515 0277
Schedule Professional Inspections for a no-obligation quote.
An annual service by a qualified technician can catch spring fatigue, cable wear, and gear degradation before they become emergencies. A1 Garage Doors Gold Coast offers inspections across all Gold Coast suburbs — see our How do I align garage door sensors?complete garage door troubleshooting guideLoosen the bracket wing nut, gently rotate or reposition the sensor until the LED glows solid, then retighten the bracket. Both sensors must face each other directly across the door opening. for more on what a full service covers, or check our emergency garage door repair Gold Coast page if you need urgent help right now.Still Can’t Get Your Garage Door Opening?
Frequently Asked QuestionsDon’t risk operating a door with a faulty safety system. A1 Garage Doors Gold Coast has been serving homeowners across the Gold Coast and Brisbane since 2020, earning a 4.9/5 rating from local families.
Why does my garage door opener run but not lift the door?📞 Call us now:
The most common reasons are a disengaged manual release cord, broken springs, a stripped gear inside the opener, or a snapped chain or belt drive. Inspect the emergency release cord first — it’s the quickest and easiest fix to rule out.(07) 5515 0277
How do I reconnect my garage door opener after pulling the release cord?
Move the door manually to the fully open position, then pull the release cord toward the motor unit (not straight down). Slide the trolley carriage back along the rail until you hear it click into the drive. Test your remote to confirm re-engagement.📍 1 Waterford Ct, Bundall QLD 4217
Can a broken spring cause the motor to run without opening the door?
Yes — this is one of the most common causes. When a spring breaks, the door weight is no longer counterbalanced, making it too heavy for the motor. The opener runs but cannot overcome the load. Broken springs must be replaced by a professional.🌐
How do I know if my garage door opener gears are stripped?goldcoastgaragedoorrepair.com.au
The tell-tale signs are a grinding or whirring sound when the motor runs, a faint burning smell (hot plastic), and complete absence of trolley movement. If you notice these signs, unplug the opener and call a technician for an assessment.Tags:
Should I replace or repair my garage door opener?
If the opener is under 10 years old and only the gears are stripped, a repair kit is usually cost-effective. For units older than 10–12 years with multiple issues, full replacement often makes better financial sense. Our garage door opener comparison and buying guide covers the leading models available in Australia.Garage Door Won't Open – Bad Sensor


